Category Archives: Lifehack

Link

Kudos to the team at Lift for launching their iOS app today:

Lift is a simple way to achieve any goal, track your progress, and get the support of your friends.

Rachel and I used to have a website many years ago where we tracked our goals and would encourage each other (“Nice work on yoga, you get an exercise check today”) and Lift is now the well-designed, simple app that I’ve been looking for as a replacement. Here’s my concise review:

This app has become a part of my daily routine. It’s helped me become more regular at the stuff I know I should do but “forget to” (looking at you, flossing…). It’s also a fun way to track habits and activities and then visualize it (I thought I ran more than I did). I’d recommend this app to anyone.

Download Lift in the app store.

Travel Tip: bring an AirPort Express to hotels

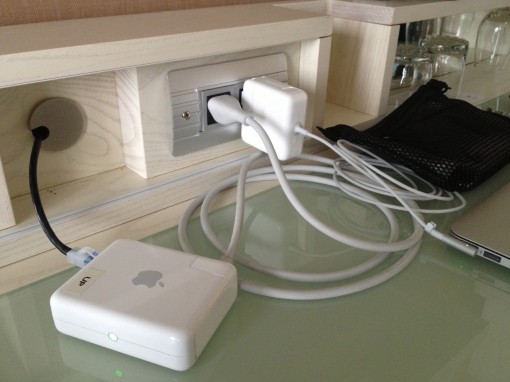
Here’s one of the best things I’ve learned while staying in hotels: bring an Apple AirPort Express wifi base station. I can’t take credit for tip this at all, this is all Alex, but the reason you do this is so you can connect multiple devices through a single access point.

Ideally, you set this access point name and security to be one your devices already know (like the one at your office or house) so you don’t have to go re-enter passwords all over the place. Plus, most paid hotel services just see the one device (AirPort) and charge you once for that connection, not for your iPhone, iPad, and notebook. Yes, I’ve once accidentally charged $14.95/day multiplied by three devices to a hotel room. And finally, it helps if you have more than one person traveling.

It’s a small, lightweight device (hardly bigger than your notebook charger) with easy configuration and a way to save money and hassle while traveling.

I dropped Safari Reading List and moved back to Instapaper

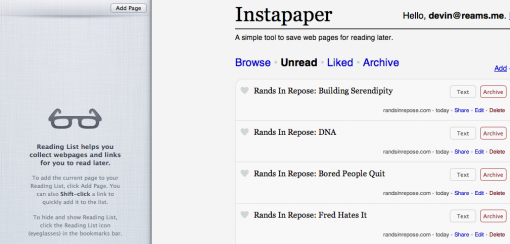
If you’ve ever looked at Safari’s new “Reading List” feature and wondered “is it good enough to replace Instapaper?” or a similar read-it-later service don’t worry, I’ve tested it out for you. Four months ago I moved all my articles into Safari (my primary web browser) and stopped using the Instapaper applications to read on my iPad and iPhone. Spoiler alert: I almost complete stopped saving articles to be read and I stopped reading saved articles.

Here are the big reasons I stopped using the Safari “Reading List”:

1. No home screen presence

Without a nagging reminder to keep reading when I pick up my phone during idle time, I default to spending my time in “less useful” ways such as checking Twitter, checking email, or playing a game. Without a dedicated application icon, for me it was hard to remember there is a list of good articles waiting for me buried in Safari (two or three taps away).

2. No API integration into apps (yet)

I find most of my long-form articles via Twitter and Reeder (RSS feeds). Both these applications have a dedicated button for sending a URL directly to Instapaper. There is no (currently) way to do this for the “Reading List” without taking two steps: open the link in Safari (which switches the currently open app) and then use the built-in Safari action to save to the Reading List (similar to ‘bookmarking’). This is slow and clumsy and led me to almost completely stop bookmarking articles to read later. Sometimes I would read it then and there just so I wouldn’t have to switch apps. Sometimes I would just skim the article and move on.

(I can only presume future iOS versions will make this a simple action available to iOS apps.)

3. No offline abilities

Instapaper does a great job turning an article into a simple, text-only version that will show up downloaded to my devices in the background. With Safari’s Reading List I need to be online to access the URL (tough luck if the URL goes offline temporarily or permanently) and then I need to use the ‘Reader’ tab to see the text-only version. Again, this seems like extra steps and clumsy. It’s close, though.

(I am aware that iOS 6 will add “Offline Reading” support, that’s why this is number three.)


Reading List has near parity to other read-it-later providers like Instapaper but it’s still a bit too fiddly to be useful. My guess is offline support will be good and a dedicated iOS “Save to Reading List” action is around the corner. I’ll try things out again and see if Instapaper drops off my home screen then. But, the point remains: without the nagging application on my home screen: I forget to read what I told myself I should.

Add missing file extension to file names

For Mac users: if you ever happen to download a bunch of similar files and they’re all missing extensions (like a directory full of photos crawled using wget), here’s a quick one-line command to add the extension to all the files: for i in * ; do mv $i $i.txt; done;

Unless I hear otherwise…

Most people are drowning in email at work. Often times you’re asked to provide one of a few responses: positive confirmation (I received this, read it, understand it all, and explicitly approve), negative confirmation (I will tell you my thoughts and describe what is wrong with this), or a passive confirmation (if I don’t respond, consider everything good to go!). The trick to managing people that receive a high-volume of email is to stop sending lengthy letters looking for a confirmation, waiting days and days and days. Sometimes, in order to keep things moving or get things done without asking permission (with folks you trust, and who trust you), simply ask for a passive confirmation: “Hey John, here is the final set of comps for the landing page. Everything we discussed yesterday is shown here including the new form style and the green button. Unless I hear otherwise, we’ll go ahead and implement this on Friday.” No more response email clutter, no debate, just delete. If you did this right, you won’t get a response. Otherwise, you’ve severely done a misdoing and you’ll hear from those folks “too busy to respond” nearly immediately. ;)

The power of Time Machine, Dropbox, and Subversion

I’ve been testing a certain unreleased [operating system](http://www.apple.com/macosx/lion/) for the past month or two and I’ve been largely pleased. That was until I ran into a nasty little bug (which has been documented to happen on Snow Leopard, too). It goes like this:

* Type on your keyboard
* Observe as a Kernal panic wipe your screen
* Reboot

A nasty little bugger, no doubt. But here’s the rub: you no longer have any login accounts.

Let me say that again because it’s important: once you reboot, you are prompted to log in to *nothing*. Not a single user account is available to select. You can type in any combination of username and password, but don’t bother, they won’t work.

The neat thing is, I could usually just grab my OS reinstall disk and do some sort of reset trick to tell the OS to create a new administrator account. But the neat part of being on the bleeding edge is… this one happens to crash when you try that.

### “No problem” says Time Machine

I plug my computer into two [Time Machine](http://www.apple.com/macosx/what-is-macosx/time-machine.html) drives almost every day. One at work and one at home.

With a quick reboot and “Restore from Time Machine”, within three hours my entire computer had been brought back to the exact state it was in on a Friday morning and I was back in business (e.g.: I could log in again).

### “I’ve already got this” says Dropbox

Once I log in, [Dropbox](http://db.tt/SwXMrCf)[^1] is already busily computing how many files I have on my machine and which ones are different than what they have on their servers. It was a lot, but within an hour everything had been re-downloaded and my documents, music, and photos were all back to exactly the way there were moments before the dreaded key combination occurred.

### “Just a few more things” says Subversion

Luckily it was a Saturday evening and I wasn’t working on anything of much importance (remember kids, commit early, commit often). So, with a quick “[svn up](http://svnbook.red-bean.com/en/1.1/re28.html)” on my work file directories I had all the code and documents back on my drive from Friday. I’m sure a few local changes I made are missing, but nothing of much significance. I’m a manager, not a maker.

And with those three simple tools: local incremental backups, storage in the cloud, and a version control system I went from utter catastrophe to right-as-rain in an afternoon. If I had my Super Duper drive it would’ve been even faster.

Bad things don’t have to happen to data. This stuff really is that easy…

[^1]: Sign up for Dropbox with [this link](http://db.tt/SwXMrCf) and we will *both* get some extra megabytes!

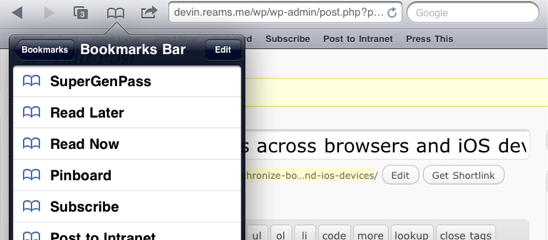
Sync bookmarks across browsers and iOS devices

You may not know this about me but I like to experiment with technology. I try different things in order to better an aspect of my life, no matter how minor. This is one of those examples…

As I’ve been struggling with which web browser to use full time (Safari is ahead of Chrome, but Firefox is necessary for Firebug), I’ve also struggled with how to keep my bookmarks organized and in-sync across all devices and all browsers. Nothing annoyed me more than getting “focused” in one browser but realizing I can’t load up a page I was thinking of because it wasn’t bookmarked over here.

And by “bookmarked” I don’t mean a funny article about Sarah Palin like what I’ve been keeping in pinboard, I’m talking about those frequently-visited sites and actions (bookmarklets) that I want to quickly access from launchbar and the awesomebar: email, calendar, task list, billing system, client websites, personal finance websites, instruction guides, social websites, online utilities, and so on.

Xmarks

This thing is stupid simple: install the browser-specific plugins, create an account and you’re done. It runs in the background and I’ve never noticed it. I’ve installed Xmarks on my Macbook Air for Chrome, Safari, and Firefox and everything is always up-to-date, no conflicts, no trouble.

This is especially handy since I can transition from one browser to the other and use the address bar the same way: type a few characters of a word, select the website I meant, and hit go. This quick, fluid motion is valuable when visiting thousands of websites each and every day. But, here’s where it gets interesting…

MobileMe

Arguably, the biggest time suck in my life is typing on an iOS device. I’m fine at the typing, but I use my iPad and iPhone almost exclusively at home. So, it annoys me to no end to try and type in a long website address with two thumbs.

Though, when a website is saved as a bookmark, the address bar will surface it to you immediate as you start typing. Much like any other address bar, this means I can type just a few characters and almost immediately tap to go. No more “fiacardservices.com” typos anymore! No more “google.com/webmasters/tools” marathon sessions.

But, how do I get all those bookmarks from my web browsers onto two more Apple devices? Easy: I pay the $99 subscription fee for MobileMe (get 30% off if you ask nicely at an Apple Store). Then, I spent 5 minutes configuring my iOS devices and personal computer settings. That’s it.

Now when I add a new bookmark *anywhere*, I don’t even have to think about it. It shows up everywhere wirelessly and effortlessly. (Sidenote: I think Apple will do very well when it adds more cloud-based offerings to MobileMe, this stuff “just works”).

Has anyone experimented with anything else?

Why I secure passwords with SuperGenPass

There’s been a lot of talk about security, passwords, and authentication. As we put more about us online, our passwords become ever so important. Everything from banking to commerce, friendships to resumes, and even our day jobs require passwords.

Passwords are broken

Having worked in information technology auditing, I can tell you that people hate passwords. If I had so many to remember and they were all necessary for me to get my job done, I would simply pick one, easy-to-remember password. Unfortunately, businesses believe this is unsafe and force users to follow silly rules (8 characters, 2 must be numeric, and you must change this password every 60 days). Due to these rules, things become less secure. Two examples:

  1. Passwords start showing up on sticky notes next to computers. Or they are all written down in a handy notebook right next to the computer (typically open to the most frequently-used password). Now that “easy to remember” to me password in my head, is now written down and easy to access by anyone.
  2. Similarly, we use a database like 1Password or some other encrypted database to store all these fancy, super-secure passwords. But, then we protect them behind a single, “easy to remember” password. Now it only takes one password to unlock all your passwords, and we’re right back at square one.

Alex and I feel strongly about password security and he’s written about it many times. Here’s my thoughts and what I’ve found works best for me.

SuperGenPass

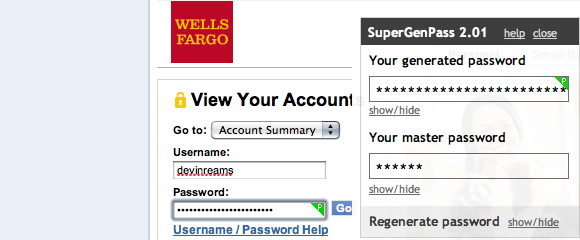
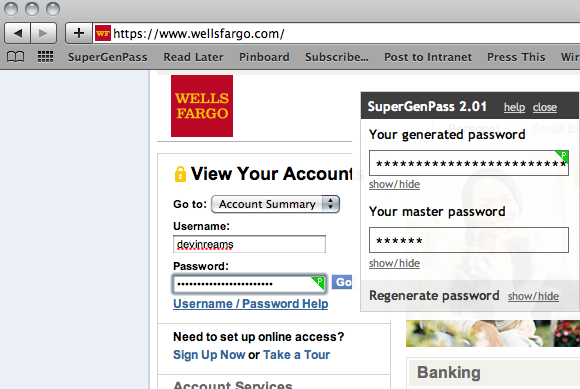
Very similar to PwdHash, SuperGenPass creates a unique, complex, secure password for every site you use. The steps are simple:

  • Enter a “master password” (eg: puppies)
  • Hash that password against the current domain (eg: facebook.com)
  • Generate a secure string using those two inputs (eg: 4ced9d6f52dc88d02028d34a3625e43d)
  • Truncate the result to X characters (eg: 10)

Here’s how SuperGenPass describes itself:

Instead of storing your passwords on your hard disk or online—where they are vulnerable to theft and data loss—SuperGenPass uses a hash algorithm to transform a master password into unique, complex passwords for the Web sites you visit.

Arguably, the concept of a “master password” means you have one “easy to remember” password that anyone can get to and then use to generate your secure passwords. But, there are a few counterpoints:

  • An attacker would need to know I use SuperGenPass (whoops)
  • They would need to know how long my generated results are (8, 10, 20 characters long?)
  • I use a secure master password which is unguessable and not something I’d write down or use elsewhere

Now that we’re all convinced (right?), the mechanisms of using a password hashing utility are super simple.

  1. Browse to site
  2. Type in master password
  3. Use Bookmarklet or Mobile site to generate hashed password
  4. Login!

Since I use Safari, I have SuperGenPass added to my Bookmarks Bar and I can use Command + 1 on any page to trigger the bookmarklet to enter my password. It then finds any “password” fields on the page and auto-populates them with the hashed version. This is very fast and hardly any more intrusive than simply typing a password into a form.

Simply entering my password into the form and hitting Command - 1 means a super-secure password is instantly replaced.

This also works well for me because I can use the Bookmarklet in Mobile Safari (iPhone, iPad). I can pull up the mobile site on any machine in the world. If it’s unavailable? No problem, I’ve stored the mobile site in my Dropbox. Since all that’s needed is JavaScript to run, I can even generate my passwords offline.

Still not convinced? Drop a line or leave a comment to share your thoughts…

How to: merge existing GMail accounts

If you’re like me you have a GMail account (something like [email protected]). But, one day, Google Apps came along and offered the opportunity for Google to host and act as your domains’ email provider. I immediately forwarded all my incoming gmail.com email to devinreams.com and set up the domain on Google Apps. Then a year later, I decided to change my domain to reams.me, so I set up another Google Apps instance and started forwarding email there.

Now I had three GMail accounts, all with different email saved in them. Oh, and suddenly, Google Voice and Contacts appered on the scene. I realized I wanted go go back to my gmail.com account. I had email all over the place.

I had Google email stored in three difference places

I wanted to consolidate the email from my two Google Apps accounts (devinreams.com, reams.me) and have my thousands of emails stored all in one place (gmail.com). “No sweat”, I thought. But, this process is harder than may appear on the surface. Below I outline a multi-step process where I

  1. physically copy email to one account to another, and
  2. setup rules so that new mail (incoming and outgoing) is coming to/from the right places.

Step 1: Setup Mail.app using IMAP

The biggest endeavor is moving the mail which is a process of: configuring multiple IMAP accounts in Apple’s Mail (I assume you can do the same in any IMAP-compatible email client), and physically copying the messages between the two servers. A few notes before we get setup:

  • Labels: Using IMAP, GMail labels will appear as ‘folders’. This means that one email with a label applied can appear in at least two places (All Mail, Label 1, Label 2). For simplicity’s sake, I decided to abandon the two-dozen-or-so unique labels that I had across the three accounts. There was no easy way to reconcile the different wording or usage I had evolved over the three years of different accounts. So, I stuck to simply moving ‘All Mail’ to ‘All Mail’ across accounts.
  • Connectivity: In order to make this (potentially HUGE) move, your network connection (upstream) will be in use the entire time. Basically, the email client is constantly sending commands such as “Copy Message A from Account A to Account B.” Needless to say, this will take a while and will require some bandwidth.
  • Timeouts means batching: In my experience, Google had a hard time keeping a connection open if I simply tried to copy 12,000 emails at once. I couldn’t tell if it was idling out (idle commands were queued to be sent after the copy commands…) or just choking on the request. I found I could easily queue a month (about 1,000) emails without Google disconnecting.
  • Duplicates: Despite my initial connection failures, IMAP and Google were smart enough not to copy duplicate messages. In other words, if I copied Message A already, and tried it again, it didn’t. So, if you lose your place when batching, don’t worry about it.
  • Crashes: Mail will crash when you first try to open your ‘All Mail’ folder (or any large IMAP folder for that matter). Just relaunch a few times and it’ll get there eventually. Trust me, it may take a few tries. This is where the ‘Activity Window’ can help tell you what’s going on.

With all that said, here’s the process:

  1. Go into your Gmail accounts and enable IMAP (Settings > Forwarding and POP/IMAP).
  2. Open Mail.app and set up your first GMail account (do not check ‘Automatically set up account’) following these IMAP instructions. DO NOT check ‘Take account online’.
  3. In the ‘Accounts’ screen, select your first account and disable all the ‘Mailbox Behaviors’ (not necessary, but prevents server-side things from happening).
  4. Switch to the ‘Advanced’ tab and change the ‘Keep copies of messages..’ setting to: ‘Don’t keep copies of any messages’.
  5. Repeat this process to set up your other account(s) that you’re moving to/from.
  6. Close the ‘Accounts’ screen and save your changes.
  7. Open the ‘Activity Window’ (command + 0) so you can watch what’s going on in the background.
  8. Now you can ‘Take All Accounts Online’ from the Mailbox menu.

At this point, you now have a Mail client setup so that your emails can simply copy across accounts without locally downloading each message. Now the fun part.

Step 2: Copy all your email from one account to the other

  1. Browse to the account you want to move email from and open the ‘[Gmail] All Mail’ folder (this is where the crashing is likely to happen, relaunch, watch your ‘Activity Window’, repeat).
  2. Start wherever suits you and select a good batch of emails (I would do one month at a time, approximately 1,000 emails per month). Do not try to copy all of them at once. If it works, congrats, if it doesn’t, you’ll have no idea how far it got before crashing or timing out.
  3. Right click your selection and select ‘Copy To’. Browse to the ‘[Gmail] All Mail’ folder of your other account. (notes: you can also drag/drop or ‘Copy and Paste’, you can also repeat this process using your labels instead of ‘All Mail’).
  4. Sit back and watch the bits and bytes fly through the internet in the Activity Window.
  5. Go ahead and queue the next batch of emails (eg: February). Repeat as much as you’d like. You can see these batches saved in the Activity Window and monitor progress.

Over the course of 3 days I was able to move about 30,000 emails in the background (set this up before you go to sleep and use an application like Caffeine to keep your computer awake). Trust me, this is much faster than the ‘POP import’ process that GMail has built-in (don’t even look it up).

Once you’ve arrived here you’ve successfully copied all your email from at least one account to another. You can confirm by browsing to your account online and doing some math. Now, I want to make sure all my future email goes to and comes from the right place.

Step 3: Setup forwarding from the old account

Very simply, all you need to do now is visit the old accounts and browse to ‘Settings > Forwarding and POP/IMAP’. Configure your old address to forward to your new address. Perfect… moving on.

Step 4: Setup your new account to send ‘from’ your old account

You’re likely aware that GMail can send email “on behalf of” other email addresses. Set your primary email account to send from your old ones (if so desired):

  1. Browse to ‘Settings > Accounts’
  2. Under “Send mail as” click the ‘Add another email address you own’ link
  3. Follow the instructions, your old address will be sent a confirmation (it should appear in your new account if you followed Step 3)
  4. If you want to use an old address as your primary outgoing address (eg: all email comes to gmail.com but I want to still send as if I’m at reams.me), then click ‘Default’ next to that address and check the “When receiving a message:” options below.

Now you can send email from your primary account as if you were still at your old ones. Learn more about custom ‘From’ addresses.

The consolidated life

Great, now I have all my email accounts flowing into my gmail.com account. My GMail contacts and Google Voice contacts are all synchronized (in addition to my iPhone contacts and Apple Address Book contacts).

Plus, I have over 4 years of email all in one place. I can find receipts from 2004 without having to login to my old accounts!

I tell you, I’m living the dream…

If you have any questions, be sure to post them in the comments.

Free Google Voice calls with T-Mobile myFaves

The following violates the fine-print for the MyFaves plans and I do not suggest you break rules. As mentioned by Josiah in the comments, the following guide goes against this statement on T-Mobile’s website: “Your five numbers must be US domestic numbers and must not include … customers’ own numbers; and single numbers allowing access to 500 or more persons.”

Some quick background: I’ve been a long-time customer of T-Mobile and have been extremely happy with their service. There have been four or five of us (friends and family) on a myFaves FamilyPlan for over four years now. We have free Mobile-to-Mobile, nights and weekends, unlimited SMS, five unlimited-call myFaves contacts and 700 minutes to share. With the $6 T-Zones internet, I pay only $37/month. life is good.

But it gets better. I rarely, if ever, am forced to use our daytime minutes thanks to Google Voice (formerly, GrandCentral).

Add your Google Voice number as a Fave

fave5

It’s not crazy, you do want your own phone number as a contact. Once you add your number to your MyFaves you can receive and make calls from/to that number with no charge. But first, make sure you set your incoming calls to display your Google Voice number instead of the caller’s number (so the calls appear from your MyFave contact):

Google Voice Set Caller ID

Why is this awesome? You never use your minutes and have more than one way to complete a call:

Google Voice call

  1. Call your number, dial a number: though not very practical, when you dial your Google Voice number from one of your existing phones (added to your Voice account) you are then prompted to listen to voicemail OR press 2 to dial a call. You can then dial a number and, while you’re still on the line, Google Voice will connect the call (unlimited talk time!). Keep in mind, the receiver will see the incoming call coming from your Google Voice number.
  2. Use the web service: your Google Voice contacts are the same as those in your Gmail account. If you sync your phone’s contacts with your Google Contacts then this is a seamless integration. All of your friends’ phone numbers appear in the Google Voice dashboard and you can click to call them. You are then called (the incoming number is your Google Voice) and your friend is connected. Again, since the call was from your Voice number, no charge!
  3. Use the mobile interface: same as the web interface, you can select a contact and have Google Voice connect the call by dialing your number (incoming from your Google Voice number).
  4. iPhone app: An application called GV Mobile for the iPhoneis available in both a free and premium versions and will interface directly with your iPhone contacts. The premium version also allows you to do cool things like review your call history, incoming SMS messages (to the Voice number), and listen to voicemail. AT&T/Apple have pulled all iPhone applications for Google Voice (including an official one from Google).

Bonus: free conference calls

One thing you’ll notice about T-Mobile MyFaves is that toll and toll-free numbers can not be added as a Fave. Bummer! No free calls to customer service, conference call lines, etc. Lucky for us, there’s FreeConferenceCall.com.

FreeConferenceCall assigns you a phone number that is not a toll free dial-in (in my experience, all the numbers are area code 605). This means you can add your conference call number as a Fave, dial in, and never be charged for the call.

(or, yes, you can just connect to the conference number through Google Voice)

UPDATE: Some users have claimed that Google Voice acts as a forwarding service and you don’t need to turn on the ‘display Google Voice’ number setting in order to have your minutes counted as myFaves. This is false. I’m looking at my call records from T-Mobile and can easily identify two calls that were charged to me though they came through Google Voice number. The display number does matter. The call presentation (announcing who is calling) does not.